Author Archives: Brooke Nichole

Countertop On A Budget

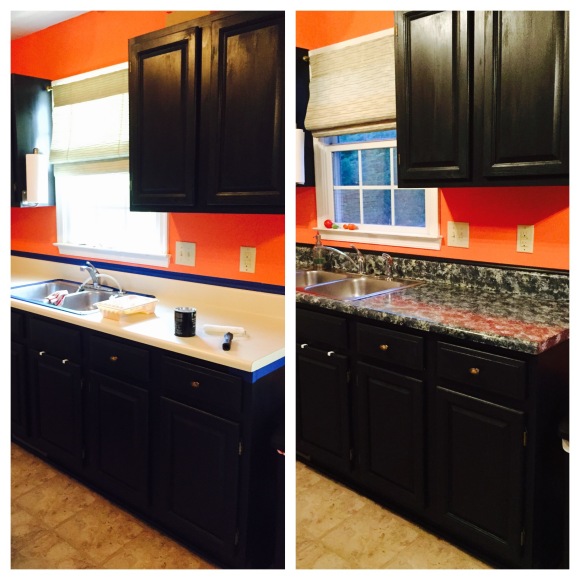
One of my final projects for the kitchen in my house was to update the tired, stained, and downright ugly countertops. Of course, being on a tight budget meant that I wouldn’t be able to replace them with the style I was looking for brand new.

After a bit of research, I found the Giani Countertop Paint kit and purchased it for about $75 via Amazon. The instructions were very easy to follow, and I finished the project in a weekend. For someone with a more artistic hand, I believe you would very easily be able to draw in more detail than I was able to with mine.

So here is a quick reminder of what the kitchen looked like in September 2013, when I first moved in.

IMG_0251.jpg

Step 1.

The first step to the transformation was putting down a base coat to cover the existing countertop. I won’t lie, part of me considered stopping here, just because the solid black looked so SLICK.

Step 2.

Apply your first color with a sponge. The kit comes with a round pourus sponge to add texture and dimension to the counter. You start with one color and sponge away, but be careful to leave enough canvas for additional shades.

 Step 3.

Switch up the color! You can continue with the sponge until you reach your desired combination of colors. In a few areas I actually went back with the base black on the sponge to break up the tones.

Step 4.

Once you have applied the colors to your preference, it’s time to add the top coat/sealant. The kit includes a roller for application, and it was extremely simple to do. That’s it!
IMG_0250.jpg

Here’s a final before/after shot. I am so in love with how this project turned out. I completed the transformation nearly two years ago, and have had very little, if any damage to the paint or countertop. When following the recommendations, you don’t want to use any harsh cleaners or leave water/liquid on the counter for long periods of time. After cooking, I would wipe everything down with an antibacterial wipe and be done.

Bonus Update!

Now, I have to brag about my drop in utensil holder. One of the best outcomes of the water damage in my kitchen was being able to replace the space between the refrigerator with a custom cabinet ($60 on the return shelf at Lowe’s) and a chunk of countertop that I got for free! I had a friend cut two holes into the countertop for me before I painted. Once the painting project was complete, I set the counter on the long open cabinet and dropped in the two metal canisters I had purchased from Amazon.

They sit perfectly in the hole, and give me extra space around the stove and outlet area. Since the cabinet is long, I use that to store my cookie racks and cutting boards. The canisters have just enough of a lip to be secure, but I can still take them out to wash any grease splatter or crumbs that may have accumulated.

Tagged , , , , ,

Screen Tight Porch Makeover

Screening in my back porch was a project that I had planned to finish in the early spring, but it became quite a sore subject as it was pushed back (due to roommate conflicts) through the summer of 2014. During my first summer living in my new home, back in 2013, I couldn’t enjoy my gorgeous back porch for the insects devouring me during the evenings. I would step outside and be covered in bites, in little to no time at all. I simply couldn’t let that stand.

I made the plan to screen around the porch using the Screen Tight plastic framing system. The benefit of using this system, is that each panel (as you will see below) has its own section of screen. If one panel is damaged, you will only need to peel back the top track of the plastic, and replace the screen for that section.

Step 1: Build The Frame

For this portion of the project, I had a contractor friend come and frame in the extra panels for me. He spent most of a Saturday morning putting it up, including the purchase of supplies.You will want to make sure that you frame the panels to fit the size of screen you plan to purchase.

Step 2: Paint the Top Coat

In order to make the newly framed portion match, I purchased the Rustoleum Deck and Concrete Restore 10x paint. It has this nice, sand grip mixed in with the paint to make the coat extra hard and slip proof. For some reason this is the only picture I took before we started placing the screen.

IMG_5415

Step 3: Install the Base Track

Next step was to install the base track, by screwing it into the porch with a power drill. In the photo above you can see a black outline around the frame of the porch. That is the bottom base.

Step 4: Roll in the Aluminum Screen

I purchased large rolls of aluminum screen that fit the dimensions of my panels. I chose aluminum because it is more durable and part of the intent of screening the porch was so that my two cats could enjoy an evening of fresh air.

In order to splice the screen in, we had to push VERY hard into the base track. But delicately, or else the screen would tear from the tension. It was a painstaking process for myself, but my friend’s dad found it much easier. Then we would cut the excess with a razor blade, as you can see in the photo below.

IMG_5414

Step 5: Place the Top Track

I selected the white frame, it was the only other option at my Lowe’s aside from a strange cream. Once the screen was spliced, placed and trimmed, we then applied the top white track to length and cut with tin snips.

IMG_5431IMG_5417

Finished!

Aside from my utter lack of strength in trying to cut the plastic or splice the screen, this was really quite a simple, two person project. For the budget I was working on, I couldn’t be happier with my new oasis. It has all held up quite well during the first winter, and I can’t wait to kick back and enjoy it for the upcoming summer!

Tagged , , , , , , , , , ,

Year One: Recap

It has officially been one year since I closed on my home. A lot has happened since I moved in, some of the moments I recall fondly, others bring on a splitting headache.

I thought it would be fun to take a look at the before & afters from the projects I completed this year:

The Paint

Before, yuck.

The Master Bedroom

MB After

The Master Bedroom Now


The living room after.

The living room after.

The living room before.

The living room before.


The Floors

And here is the new floor against the cabinets.

And here is the new floor against the cabinets 

Here's the kitchen before the cabinet makeover.

Here’s the kitchen before the cabinet makeover.


The Landscaping

Trees and bushes surrounded the house.

Trees and bushes surrounded the house.

IMG_4900

Now I’m working to plant some small perennials.


There’s still plenty more to come. Currently waiting for several nice sunny days so that we can paint the back porch and start installing the screen before the mosquitoes hatch and take over. I’m also finishing up some final touches on the kitchen so that I can start painting the countertops. Can’t wait to enjoy some of these improvements!


Flooring: Part 2

This post goes up a little late, but the kitchen flooring is complete! I decided to install the TrafficMaster Allure vinyl tile flooring sold by Home Depot. This type of flooring is known as “floating” because it does not attach to the subfloor or any walls, but is intended to expand and contract across your flooring as your home’s environment changes.

The idea behind this product is simplicity and affordability. The box literally boasts, “The Easiest Floor Ever!” but I’m here to inform you, this is not the case. Nothing about this installation was easy. It wasn’t messy, as some other types of flooring installation could be, but that is the only positive thing I can say about the process.

The tiles are extremely hard to cut, and deceivingly crooked coming out of the packaging. No matter how careful I was in placing each new strip, there would be a tiny gap in between each section. The frustration of seeing the cracks, and attempting to correct the placement caused my helper an I to spend almost 5 hours working on half the room.

Eventually, we determined it was impossible to install the tile sections without the cracks and began to trudge on. Certain corners of the floor were bent in the package and there are now one or two spots that keep popping back up. I haven’t found a solution to this problem yet, but I’ve read that there are special glues that be can poured under the corner and at some point I will track one down and give it a whirl.

The overall look of the tile is very nice, which is why I chose it. It was affordable as I mentioned above, and came with a 25 year warranty. My best advice to anyone looking to use this style of product in their home, is choose the room wisely. If you will need to make cuts around appliances or cabinets, like I did, go with something else.

This style of floating vinyl comes in a sheet of three 12″ x 12″ squares rather than the interchangeable planks the brand installation videos show you. I attribute the dimensions of the product to the difficulty we had when installing because we were not properly prepared for the headaches of having to cut the tough sections and the possibility of slicing a tile in half right in front of the refrigerator.

I do quite like the feel of the vinyl, much more than the previous linoleum flooring that came with my house. But I would still advise anyone intending to use this product to plan for a very long installation process (and buy a vinyl tile knife).

Also, the replacement trim and quarter round have been added throughout the house, which leaves only my bathroom floor to be finished!

Another post to come soon!

Tagged , , , , , , , , , , ,

Flooring: Part 1

For the last two months, I have slowly been replacing the flooring (partially flooded) in my house. I cut all of the carpet and padding out on my own, and pulled staples and nail strips until I thought I might go crazy.

IMG_3852

So many nails…

But once they were gone, oh.my.gawd. How much better my new floors look!

I purchased the Harmonics brand laminate flooring from Costco in the “Sunset Acacia” shade. It is a great product, but definitely not as easy to install as the video on their website would have you believe. If it were not for the kind donation of time from best friend’s father, and his tools, I would never have gotten these installed on my own.

My house is decorated for Christmas, and ignore the mess in the background of some images (I’m getting there). Yes, the cats did follow me into every room and jump in the pictures. For a look at the “before” check out my first post.

Tagged , , , , , , ,

Sunday Crafting: DIY Bottle Brush Snow Globes

Today was a productive day. I ordered my new kitchen flooring from Home Depot, in 7-10 days I should be rolling out that project. In the meantime I decided to get a head start on decorating my house for the holidays. I don’t have much to put out this year, but I’m forcing myself to wait until after Christmas to purchase any new decorations. I’ll be able to stretch the money more and have a fabulous decorated home for next year! On the current penny, I’ve made what I have work and the house looks so cozy and adorable right now.

Today’s trip led me to my least favorite store Michael’s which for once had what I needed and was holding a ridiculous sale on holiday accessories. So, the rest of my evening was spent watching Boardwalk Empire and making these delightful decorative additions.

Simple craft, and beautiful results.

I hot glued a bottle brush tree to the lid of a mason jar, poured in some snowflakes and gave a gentle shake. To spice up the rim, I used some beaded garland I picked up during the sale and twisted around the lid.

Aren’t they adorable? If I can manage, I may go back and decorate a few of the trees…

Tagged , , , ,

I MUST CLIMB THIS.

As promised here are two photos of Boozie (Amy Winehouse) being the annoying little brat that she is:

If she weren’t so dang cute when she sleeps at my feet during the night, I probably would have booted her on out a long time ago.

The Transformations of Cabinets

After the flood and ServiceMaster’s week long mitigation (which nearly drove me insane) I decided there would never be a better time to paint my cabinets. I had previously decided that “some day” I would like to paint them black so as to appear more modern and make them uniform. I believe they were all bought at different times, the patterns in the wood were different and once I began taking the doors off I noticed many had holes drilled in them and were not the quality my dear elder family members would have me believe.

I purchased the Rustoleum cabinet transformations kit for seventy some dollars at Lowe’s and it was absolutely worth it. It took me forever, because I did the whole project on my own and had little space to let the doors dry. If you plan to tackle this project yourself, be prepared to spend a great deal of time on it.

Rustoleum

So, here is how it all went down:

IMG_3456

IMG_3459IMG_3457

1. The first step as instructed on the kit is to degloss and degrime the cabinet surface. It was easy, and went fairly quickly. *Tip: When they say “apply liberally” you can never apply liberally enough. I had almost 3/4 a bottle left and I thought I might drown in the stuff.

2. Painting the cabinet surface. It took me about two weeks painting every night after work, and as much as I could on the weekends. The bonding paint that comes in the kit works wonders on the surface. I knew that I didn’t have enough of the boding paint to do all of my cabinets so I sparingly used the bonding paint to do the first coat and then bought a regular latex paint in a similar shade to do the second coat. It covered perfectly, and stuck just as well after the Rustoleum product. So instead of spending another $74 on another kit for just that paint, I paid about $10.

SO.MANY.DOORS

SO.MANY.DOORS

3. The protective top coat was not as tricky as I expected it to be. As recommend on one of the product reviews I read, I added a few drops of water to the solution to make it easier to work with. Brush strokes were tricky in a few areas, and I ended up with a boo boo or two but overall-terrific!

4. The hardware on the doors was an icky gold which I am attempting to rid my house of (still got a few light fixtures to take out.) And after pondering on whether or not I could afford all new hardware I decided it would be easiest to simply remove the knobs from the doors and patch the holes. I bought new antique brass knobs for the drawers and far wall cabinets (they actually match the hinges) just to give a touch of something to the black.

Here are the results!

IMG_3530

IMG_3553

IMG_3562

Tagged , , , , , ,

And Then The Floods Came…

Now, this is a story all about how my life got flipped-turned upside down, and I’d like to take a minute just sit right there…wait no that’s not right. My house flooded.

Near the end of September I attended a training in Weyers Cave for work, one of the only times since I started my new job that I haven’t been home at 5:05. On this fateful day, I arrived home closer to 6:00 to the sound of running water. And then, as I looked in to my kitchen I noticed a glimmer across the floor that seemed out of place.

That’s because the sound of running water was coming from the line that puts water to my ice maker and it was gushing out onto the floors of my house. Panic ensued, as I could not reach the valve to switch off the running water and I started frantically calling friends to come and help me move the fridge and get to the valve.

So what happened? The city of Waynesboro was doing work in my neighborhood on the water lines that week, and did not inform the residents. They shut the water off that afternoon, and when they switched it back on the pressure was so great, it blew that line from my ice maker right out of its fitting. My neighbors also incurred damage, and for several weeks the water pressure in our neighborhood was at an unsafe level. I know this because I’ve spent the last month talking with plumbers, and repair technicians trying to get my house back into living order. Also, someone from the city passed on the knowledge of the broken line to me.

That night, my kitchen floor was torn out, the carpet and padding pulled back, and I lived with 97 degree heat with fans and dehumidifiers circulating warm dry air for about a week. It was unbearable. Once the floors were finally dry, and the crawlspace repaired I was left with quite a mess. I’ve lost the baseboards, two standing cabinets, the floor of my bathroom and I’ve got holes in the walls of my kitchen.

My insurance agency is helping to cover some of the damage, but they wouldn’t allow for replacement carpet in the living room or bedroom, so I made the decision to remove the nasty stuff myself and replace with laminate wood flooring. Bit by bit I’ve been working to tear up what I can and try to get things back to normal.

I’m still waiting for official word, but it seems as though the city is denying all fault for the damage. If anyone has suggestions on how I can fight them, please let me know!

I keep telling myself I wanted to update my house eventually anyway, I’ve just gotten an unfriendly kickstart to doing it.

Tagged , , , ,

In With The Old && Now It’s New

Finding furniture that I like is hard. Like, really hard. I searched for weeks for a couch that was within my price range but fit my style. Finally, I gave up and took a free couch from a college friend until I can find one I really like.

In the meantime, I’ve taken it upon myself to turn the old items I already had or was given into something that does fit my style.

Take a look through the album to see how I’ve turned a tight budget into a series of pieces with worth admiring.


Tagged , , , , , , ,