One of my final projects for the kitchen in my house was to update the tired, stained, and downright ugly countertops. Of course, being on a tight budget meant that I wouldn’t be able to replace them with the style I was looking for brand new.
After a bit of research, I found the Giani Countertop Paint kit and purchased it for about $75 via Amazon. The instructions were very easy to follow, and I finished the project in a weekend. For someone with a more artistic hand, I believe you would very easily be able to draw in more detail than I was able to with mine.
So here is a quick reminder of what the kitchen looked like in September 2013, when I first moved in.

Step 1.
The first step to the transformation was putting down a base coat to cover the existing countertop. I won’t lie, part of me considered stopping here, just because the solid black looked so SLICK.


Step 2.
Apply your first color with a sponge. The kit comes with a round pourus sponge to add texture and dimension to the counter. You start with one color and sponge away, but be careful to leave enough canvas for additional shades.


Step 3.
Switch up the color! You can continue with the sponge until you reach your desired combination of colors. In a few areas I actually went back with the base black on the sponge to break up the tones.


Step 4.
Once you have applied the colors to your preference, it’s time to add the top coat/sealant. The kit includes a roller for application, and it was extremely simple to do. That’s it!
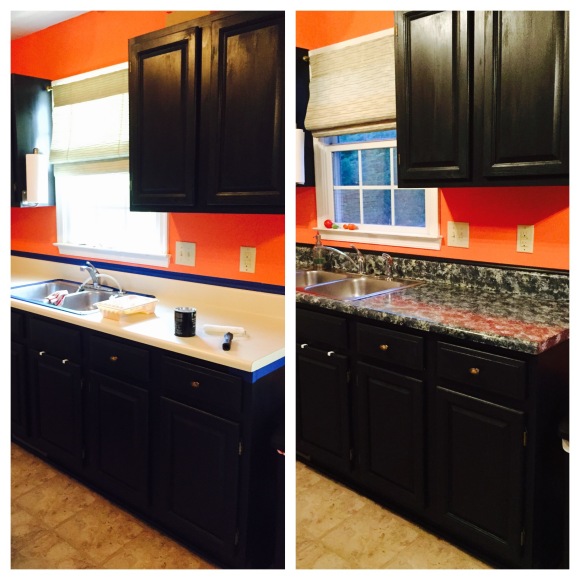
Here’s a final before/after shot. I am so in love with how this project turned out. I completed the transformation nearly two years ago, and have had very little, if any damage to the paint or countertop. When following the recommendations, you don’t want to use any harsh cleaners or leave water/liquid on the counter for long periods of time. After cooking, I would wipe everything down with an antibacterial wipe and be done.
Bonus Update!
Now, I have to brag about my drop in utensil holder. One of the best outcomes of the water damage in my kitchen was being able to replace the space between the refrigerator with a custom cabinet ($60 on the return shelf at Lowe’s) and a chunk of countertop that I got for free! I had a friend cut two holes into the countertop for me before I painted. Once the painting project was complete, I set the counter on the long open cabinet and dropped in the two metal canisters I had purchased from Amazon.
They sit perfectly in the hole, and give me extra space around the stove and outlet area. Since the cabinet is long, I use that to store my cookie racks and cutting boards. The canisters have just enough of a lip to be secure, but I can still take them out to wash any grease splatter or crumbs that may have accumulated.


